阿里云linux下的云磁盘(数据盘)挂载步骤
阿里云默认购买后是没有挂载数据盘的,这个时候我们就需要在第一次启动系统后进行磁盘挂载操作,有两种方法,我们购买的阿里云服务器默认都提供了一个auto_fdisk.sh,直接执行这个就自动挂载数据盘了。还有一个方法就是自己手动一步一步挂载,这里进行一下介绍。
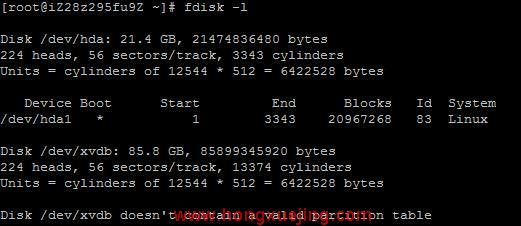
首先我们通过 fdisk -l 查看磁盘情况

然后我们开始给/dev/xvdb分区
可以在管理台查看挂载点,如下图所示:

执行fdisk /dev/xvdb

Command (m for help): m (输入m进行帮助提示)
Command action
a toggle a bootable flag
b edit bsd disklabel
c toggle the dos compatibility flag
d delete a partition
l list known partition types
m print this menu
n add a new partition
o create a new empty DOS partition table
p print the partition table
q quit without saving changes
s create a new empty Sun disklabel
t change a partition's system id
u change display/entry units
v verify the partition table
w write table to disk and exit
x extra functionality (experts only)
Command (m for help): p (我们先查看一下)
Disk /dev/xvdb: 85.8 GB, 85899345920 bytes
224 heads, 56 sectors/track, 13374 cylinders
Units = cylinders of 12544 * 512 = 6422528 bytes
Device Boot Start End Blocks Id System
Command (m for help): n (创建一个分区)
Command action
e extended
p primary partition (1-4)
p
Partition number (1-4): 1 (第几个就输入几)
First cylinder (1-13374, default 1):
Using default value 1
Last cylinder or +size or +sizeM or +sizeK (1-13374, default 13374):
Using default value 13374
Command (m for help): p (查看一下分区情况,看是否配置正确)
Disk /dev/xvdb: 85.8 GB, 85899345920 bytes
224 heads, 56 sectors/track, 13374 cylinders
Units = cylinders of 12544 * 512 = 6422528 bytes
Device Boot Start End Blocks Id System
/dev/xvdb1 1 13374 83881700 83 Linux
Command (m for help): w (写入分区)
The partition table has been altered!
Calling ioctl() to re-read partition table.
Syncing disks.
-------------------
分区完毕进行格式化,使用mke2fs命令
[root@iZ28z295fu9Z ~]# mke2fs -j /dev/xvdb1
mke2fs 1.39 (29-May-2006)
Filesystem label=
OS type: Linux
Block size=4096 (log=2)
Fragment size=4096 (log=2)
10485760 inodes, 20970425 blocks
1048521 blocks (5.00%) reserved for the super user
First data block=0
Maximum filesystem blocks=4294967296
640 block groups
32768 blocks per group, 32768 fragments per group
16384 inodes per group
Superblock backups stored on blocks:
32768, 98304, 163840, 229376, 294912, 819200, 884736, 1605632, 2654208,
4096000, 7962624, 11239424, 20480000
Writing inode tables: done
Creating journal (32768 blocks): done
Writing superblocks and filesystem accounting information: done
This filesystem will be automatically checked every 30 mounts or
180 days, whichever comes first. Use tune2fs -c or -i to override.
----------------------
之后就是进行挂载了,vi /etc/fstab
/dev/xvdb1 /webservers ext3 defaults 0 0
到结尾,编辑后的/etc/fstab如下:

建立挂载点目录 mkdir /webservers
执行 mount -a 使配置生效
可能碰到的问题:
mount: wrong fs type, bad option, bad superblock on /dev/sdd
这个时候需要重新检查是否正常分区并格式化了,或者格式化的格式与挂载生命的格式不一致。
- 卸载aliyun linux 15预装的java运行环境openjdk 1.6(2016-01-30)
- aliyun linux配置vsftpd及配置iptables允许连接(2015-03-11)
- aliyun linux 5.7配置使用rsync和inotify实现集群配置时文件的自动同步(2015-03-07)
- aliyun linux 5.7直接使用aliyun提供的源(2015-02-01)
- 在aliyun linux 5.7下配置nginx服务器(senginx)(2014-09-24)
- aliyun linux 5.7更换使用centos的yum源(2014-09-23)
- 在aliyun linux下安装libmcrypt库(2014-09-21)

